Let me be upfront with you. The Philippines is not the easiest country to backpack. The inter-island flights eat into your budget fast, the traffic in Manila is genuinely some of the worst I have experienced anywhere in Asia, and the tourist infrastructure outside of big spots like Palawan or Boracay can feel a little rough around the edges. But here is the thing — the Philippines rewards you in ways few countries can. The kind of beaches that make you stop mid-sentence. People so warm you actually feel bad leaving. And a street food scene that Southeast Asia shamelessly ignores but absolutely shouldn’t. If you come here with patience and a loose plan, it will be one of the best trips of your life.
Philippines at a Glance
Best Places to Visit in the Philippines
The Philippines has 7,641 islands — which sounds incredible until you realize that island-hopping between them can cost a small fortune if you are not careful. Most backpackers cluster around a handful of islands that are well worth the hype, but there are a few underrated ones that barely get mentioned. I will cover both. Start with these, and then go rogue.
1. Manila
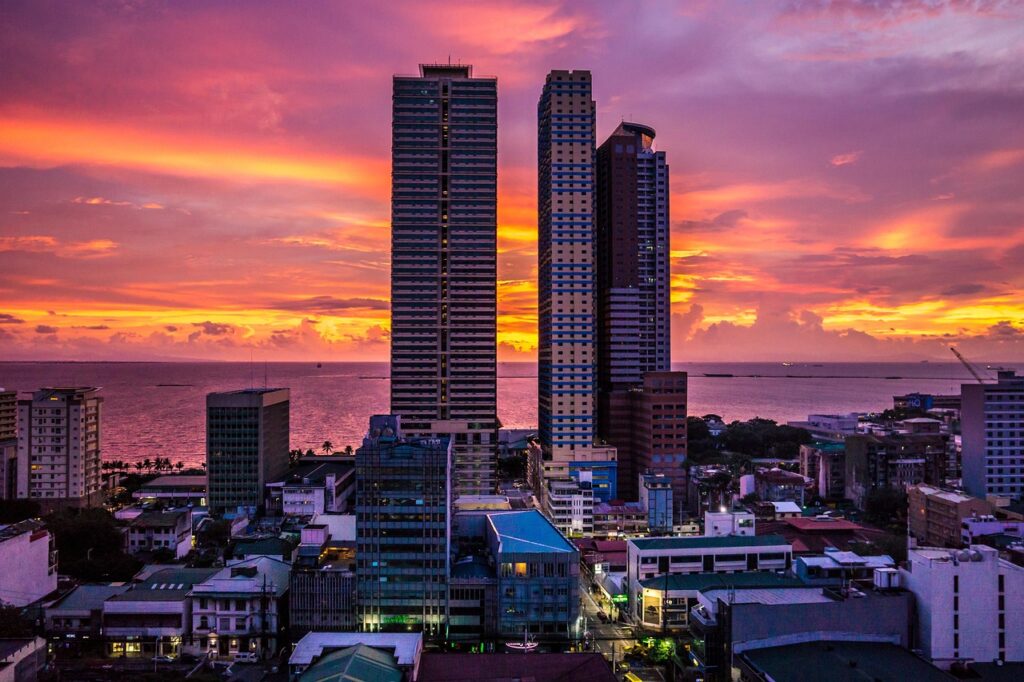
Look, I will be honest — Manila divides people. It is chaotic, loud, and the traffic is on another level of bad. Grab a ride across town during rush hour and you will cover 5 kilometers in 45 minutes. But write Manila off completely and you will miss the parts that are genuinely worth your time.
Intramuros is the old walled city built by the Spanish in the 16th century and it deserves at least half a day of your time. The thick stone walls, the cobbled streets, and Fort Santiago — where the national hero José Rizal was imprisoned before his execution — all carry a weight that you don’t get in sanitized tourist attractions. Rizal’s story alone is enough to make you want to understand the country better. Fort Santiago entrance is ₱75 (about $1.30), which is nothing.
Binondo — Manila’s Chinatown, supposedly the oldest in the world — is where you go to eat. Seriously, skip the hotel breakfast and come here. Pork dumplings, hopia, fried siopao — all for under ₱100 a serving. The National Museum of Natural History is free on Sundays and genuinely impressive. Hit both on the same day and you have a solid Manila itinerary without spending much.
Stay in Makati or Poblacion if you want cafés and relatively reliable infrastructure. Stay in Ermita or Malate if you want cheaper dorms and easier access to the old city. Avoid overpaying for accommodation just because you see a rooftop pool — that is a Manila trap for sure.
The LRT (Light Rail Transit) and MRT lines cover a good chunk of the city and cost ₱15–₱30 per trip. Far cheaper than a Grab ride and faster during rush hour, if you can handle the crowd. Jeepneys are ₱13 for the first 4 km — colourful, cheap, and a real experience. For late nights or complex routes, Grab is the safest and most predictable option.
2. El Nido, Palawan
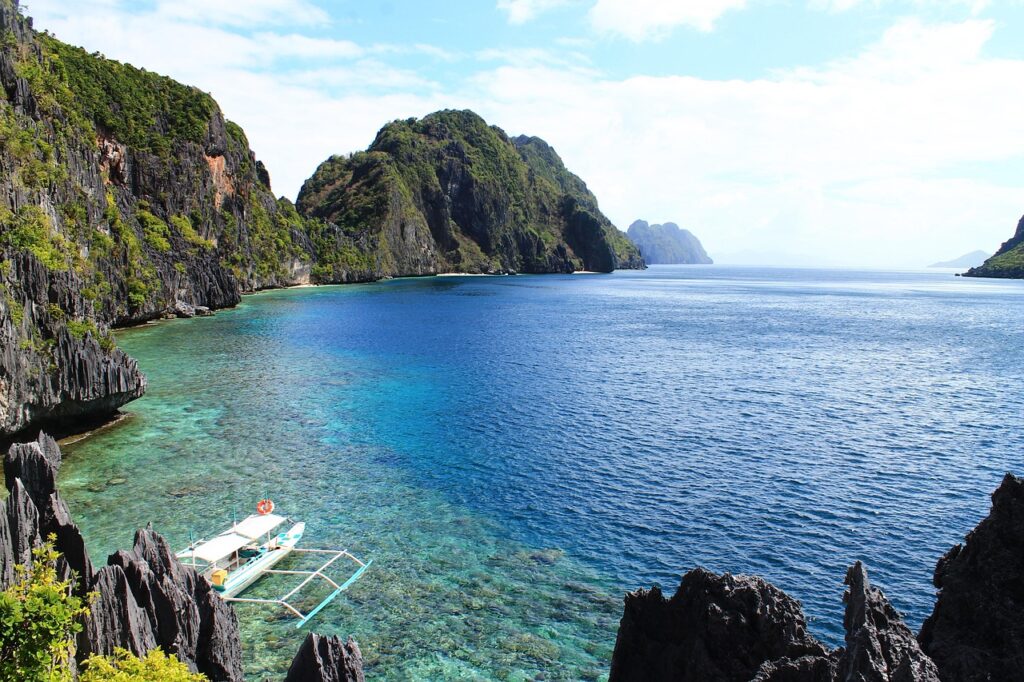
If you have seen any “Philippines travel” photo on the internet, it was probably taken in El Nido. And the thing is — the reality actually lives up to the photos. The limestone karsts jutting out of teal water, the hidden lagoons, the small beaches tucked inside coves — it is one of those places that makes you genuinely question your life choices for not coming sooner.
Island hopping tours are the way to experience El Nido. Tour A is the most popular and covers the Big Lagoon, Small Lagoon, Secret Lagoon, and Shimizu Island. A shared boat tour costs around ₱1,200–₱1,500 ($21–$26) per person — note that this is the base boat price and you’ll need to add a mandatory El Nido eco-tourism environmental fee of ₱200–₱400 (paid once, valid 10 days) on top. Lunch prepared on the boat is included. Tour C (Helicopter Island, Matinloc Shrine, Hidden Beach) is slightly less crowded and equally stunning. Do not bother booking private tours unless you are in a group — the shared boats are fine and you usually meet good people.
The town of El Nido itself is a bit touristy and getting more expensive year by year. Accommodation that cost ₱500/night a few years ago now runs ₱900–₱1,500 for a basic dorm. The beaches in the town area are also not spectacular. The real deal is out on the water. Budget for 2–3 island hopping days and you will leave satisfied.
One honest note: El Nido gets crowded during peak season (December–February). The Big Lagoon in particular can feel like a floating traffic jam. Consider going during shoulder season (October–November or March–April) if you want more elbow room, though check weather forecasts — the tail end of typhoon season is unpredictable.
Fly into Puerto Princesa (PPS) — that is the main airport in Palawan. From Puerto Princesa, you take a van or bus to El Nido. The van takes 5–6 hours and costs around ₱650–₱800 one way. Book at the terminal or through guesthouses. Some budget airlines now also fly directly into El Nido’s Lio Airport — check Cebu Pacific and AirAsia for deals, but the small airport has limited flights so do not rely on it as your only option.
3. Coron, Palawan
Coron is El Nido’s quieter, slightly more interesting sibling and I will argue it is the better pick for most backpackers. Where El Nido is all about lagoons and beaches, Coron adds a historical layer that makes it genuinely unique. The Coron Bay area was the site of a major World War II naval battle — and it is worth knowing the history correctly, because the details are genuinely dramatic. On September 24, 1944, the US Navy’s Task Force 38 launched a surprise attack from aircraft carriers stationed 340 miles away. Ninety-six Hellcat fighters and 24 Helldiver dive-bombers flew the entire distance, found a Japanese supply fleet hiding in the bay, and sank twelve ships in under twenty minutes before turning around. It was the longest-range carrier air attack ever launched at that point in the war. Today, those sunken ships have turned into extraordinary dive sites — easily some of the best wreck diving in the world.
Even if you are not a diver, Coron has Kayangan Lake — consistently ranked as one of the cleanest lakes in Asia — Barracuda Lake with its strange thermocline effect, and Twin Lagoon. The island hopping here (around ₱1,500–₱1,800 for a shared tour) is arguably as beautiful as El Nido but with noticeably fewer people. The town itself is more laid-back, the food is cheaper, and the accommodation options for backpackers are decent.
A fun tip: climb Mt. Tapyas right in town. It is about 700 steps up, not particularly difficult, and the panoramic view from the top at sunset is one of the better free things you can do in the Philippines. Go at 4:30 PM and watch the sky turn orange over the islands. Bring water — it gets warm.
Fly into Francisco B. Reyes Airport (USU) in Busuanga from Manila. Cebu Pacific and AirAsia both operate this route and you can find tickets for ₱1,200–₱2,500 ($21–$44) if you book in advance. The airport is about 45 minutes from Coron town by tricycle or shuttle (₱150–₱200). There is also a ferry from El Nido to Coron — a scenic 4–5 hour boat ride that costs around ₱1,500–₱2,000 and passes through some beautiful islands. This is worth considering if you are combining both destinations.
4. Cebu City & Surroundings
Cebu is the second-largest city in the Philippines and the major hub for the Visayas region. As a place to stay, it is functional — Cebu City has everything you need, but it is not somewhere most people come for the sights. The Basilica Minore del Santo Niño is worth a visit (free entry), and Magellan’s Cross — where Ferdinand Magellan supposedly planted a cross upon arriving in 1521 — is nearby. Both are interesting historically, though the original cross is now encased inside a second wooden shell of tindalo wood — placed there to protect it from local devotees who chipped pieces off it believing it had miraculous healing powers. The cross you see today is that protective outer casing, not the original. Worth knowing before you visit.
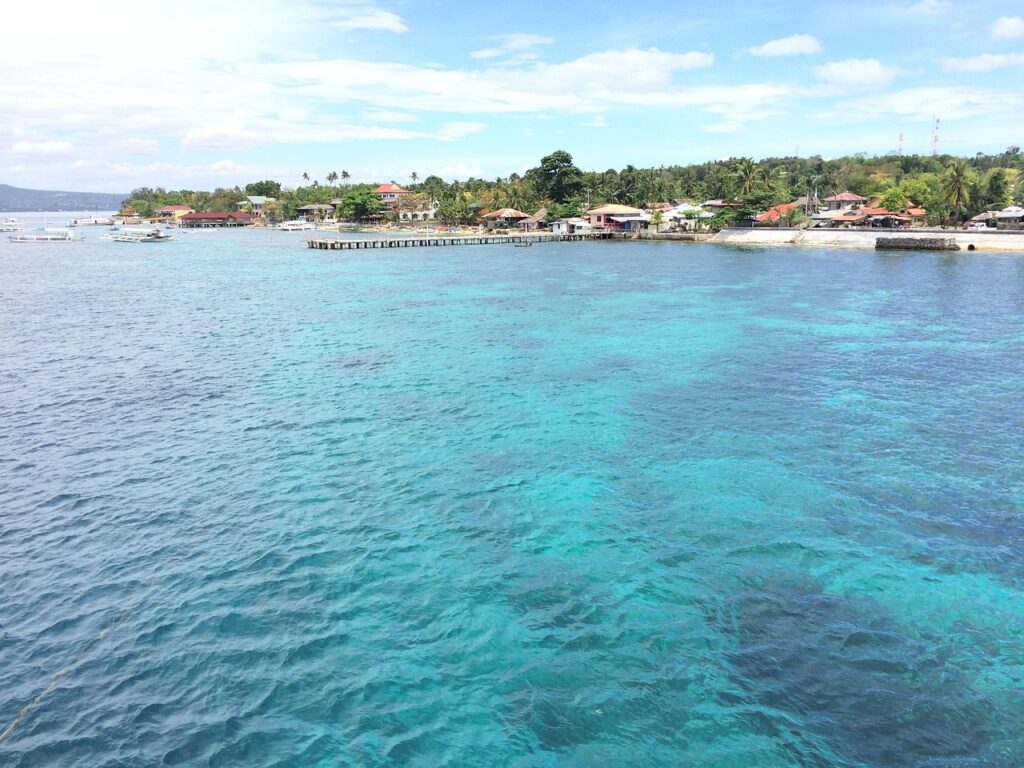
What Cebu is actually famous for among backpackers is what surrounds it. Oslob, about 3–4 hours south of the city, is where you can swim with whale sharks. This is one of those experiences that sounds magical and, credit where it is due, it is incredible to be in the water next to the biggest fish on the planet. However, I have to be real here — the way it is managed in Oslob is controversial. The whale sharks are fed to keep them in the area, which alters their natural behaviour. If you are sensitive to wildlife ethics, look into whale shark watching alternatives in Donsol (Bicol region) instead, where encounters are unmanaged and much more natural, even if less guaranteed.
Moalboal, 2.5 hours south of Cebu, is the highlight most people sleep on. Panagsama Beach here is the base for some of the most surreal snorkeling you will ever do. A massive sardine run — literally millions of sardines moving as one enormous silver cloud — happens just metres off the shore. Jump off the beach, swim for 30 seconds, and you are inside the middle of it. It is free. No boat required. That sardine run alone is worth the trip to Moalboal.
Cebu Mactan International Airport (CEB) is well connected from Manila, Palawan, and other Philippine cities. From Cebu City, V-hire (van hire) minivans are the budget way to reach Moalboal (₱100, ~2.5 hrs) and Oslob (₱160–₱180, ~3.5 hrs) from the South Bus Terminal. Way cheaper than renting a car or private transfers. For Oslob whale shark swimming, start at 5–6 AM — earlier is much better as crowds get thick by mid-morning.
5. Bohol
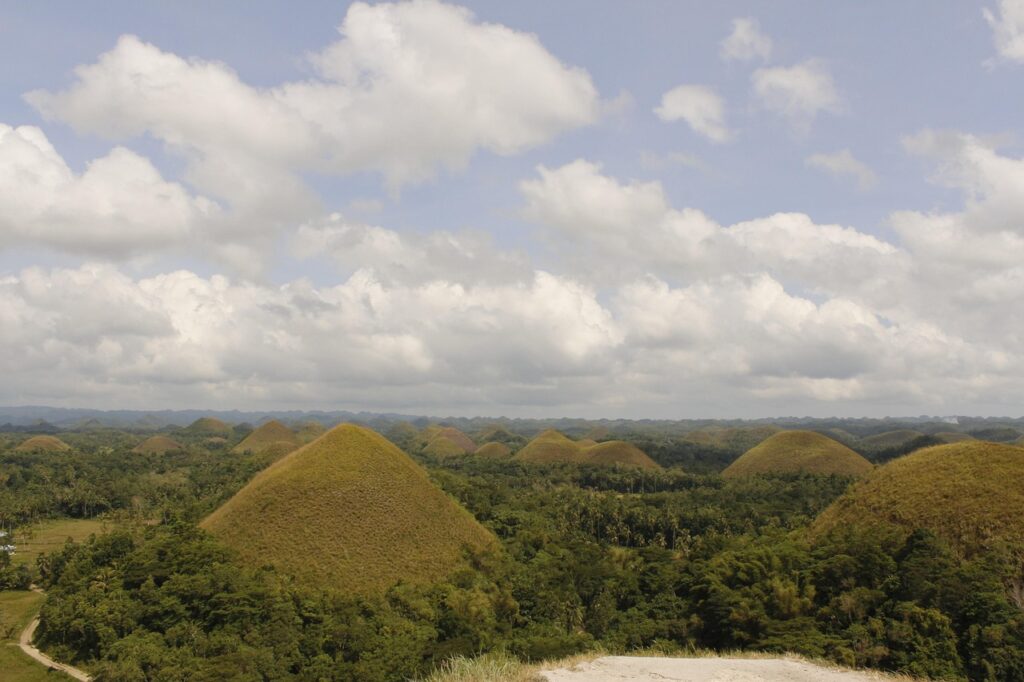
Bohol is one of those islands that packs multiple world-class experiences into a relatively small area and gets it done cheaply. Most backpackers use it as a day trip or a 2-night stop from Cebu, and honestly two nights is enough to do it justice without rushing.
The Chocolate Hills are the island’s most iconic sight — at least 1,268 perfectly cone-shaped hills (with some counts putting it as high as 1,776) that turn brown and chocolate-coloured in the dry season (hence the name). The view from the observation deck is genuinely otherworldly, like someone built the landscape in a video game. Entry is ₱100. It is touristy, yes, but you should still go.
The Philippine tarsier is one of the world’s smallest primates — a tiny, enormous-eyed creature that is nocturnal and genuinely looks like it has seen too much of the world. The Tarsier Research and Development Center in Corella is the most ethical place to see them (₱60 entry). The tarsiers roam relatively freely in a forested sanctuary rather than being held in cages for photos. That distinction matters — avoid any place that lets tourists handle the animals. Tarsiers are fragile, stress-prone creatures, and poorly managed tourism has already caused harm to local populations.
Panglao Island, connected to Bohol by bridge, has Alona Beach — a popular backpacker beach with guesthouses, dive shops, and the kind of open-air restaurants where you eat grilled fish with your feet in the sand. Diving here is excellent and affordable (around ₱1,000–₱1,400 per dive including equipment). Balicasag Island, a quick boat ride from Panglao, has one of the finest reef ecosystems in the country.
The most common route is by fast ferry from Cebu City (Pier 1) to Tagbilaran City (Bohol’s capital). Fast ferries (OceanJet and SuperCat) run frequently, take about 2 hours, and cost ₱800–₱1,200 per person depending on class. Budget tip: Lite Shipping slow ferries cost ₱600–₱800 but take 3–4 hours — fine if you’re not rushed. OceanJet is the most reliable operator. Book a day ahead if you’re traveling during peak season. Once in Tagbilaran, rent a motorbike (₱350–₱500/day) for flexibility or hire a tricycle for short hops. A full-day tour with a tricycle driver covering the Chocolate Hills, tarsier sanctuary, and river cruise runs about ₱1,500–₱2,000 — split that between travel companions and it becomes a solid deal.
6. Siargao
Siargao has gone from word-of-mouth surfer secret to full-blown Instagram destination in about a decade. It is more expensive than it used to be, and during peak season (September–November, when the Pacific swells are most consistent and Cloud 9 fires regularly), the main strip of General Luna can feel surprisingly crowded. December onwards sees the swells shrink and the winds turn onshore, so if surfing is the main goal, aim for September to November. But even with all of that, Siargao still delivers. The vibe is hard to replicate elsewhere — hammock culture, barefoot restaurants, sunsets over coconut trees, and Cloud 9, one of the most famous surf breaks in Asia.
Cloud 9 is a world-class right-hand reef break that draws professional surfers every year for the Siargao Cup. As a beginner, you are not surfing Cloud 9 — that would be inadvisable at best and dangerous at worst. But beginners have plenty of options for surf lessons in the calmer areas around General Luna (₱400–₱600 for a lesson with a board). Watch the pros from the iconic Cloud 9 viewing deck and feel appropriately humbled.
Beyond surfing, Siargao has some fantastic natural spots. Sugba Lagoon is a large, brilliant-blue lagoon you access by boat from Del Carmen (₱700–₱800 for the boat shared between passengers). Naked Island, Daku Island, and Guyam Island can be visited in a single island-hopping trip for around ₱800–₱1,000 per person. Magpupungko Rock Pools — tidal rock pools on the eastern coast — are free to visit and worth the motorbike ride out.
One thing to flag: Siargao has rebuilt significantly since Super Typhoon Odette (2021) caused major destruction, and it is back in full swing. That said, typhoon risk is real in this region — if you are visiting between October and February, keep an eye on weather warnings. The surf is best then but the typhoon risk is also highest.
Fly into Sayak Airport (IAO) in Siargao — small but functional. Cebu Pacific operates direct flights from Manila (roughly ₱2,500–₱6,000 return if booked well in advance; last-minute can run much higher). From Cebu, there are also ferries via Surigao City on the mainland — take a bus or van to Surigao then a ferry to Siargao (₱200–₱250, 2 hrs). It is a longer journey but much cheaper than flying. Once on the island, rent a motorbike — it is the standard way to get around (₱350–₱500/day). Habal-habal (motorbike taxis) are also available if you do not want to ride yourself.
7. Vigan
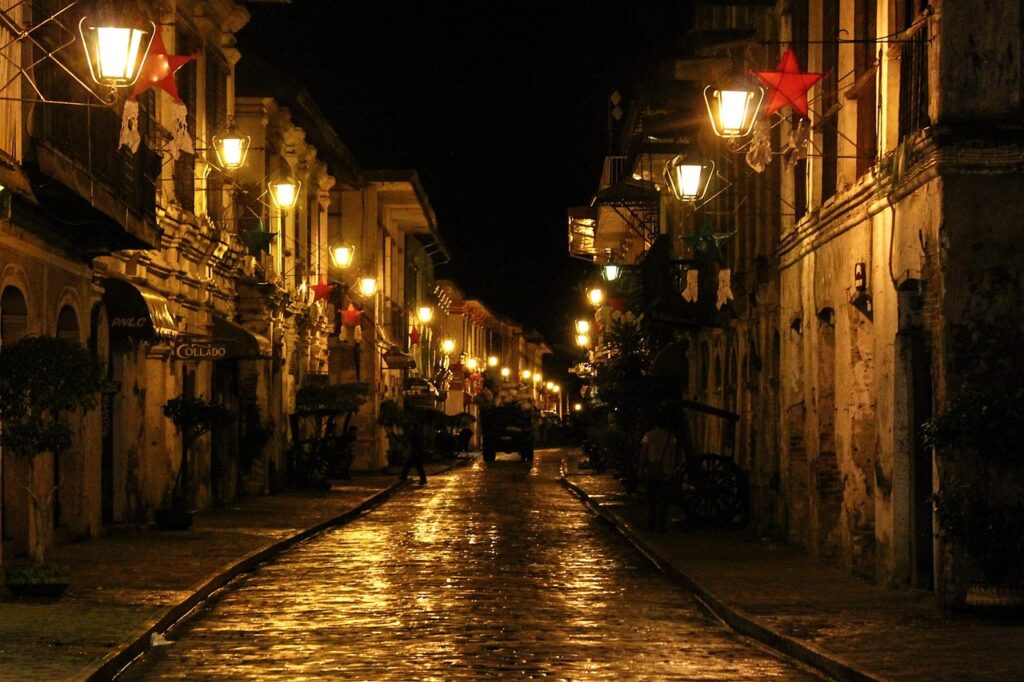
Vigan is the most underrated destination in this entire list and the one most backpackers skip simply because it does not fit neatly into a beach-focused itinerary. That is a mistake. Vigan is a UNESCO World Heritage City and home to one of the best-preserved examples of Spanish colonial architecture in Asia. Walking down Calle Crisologo — a cobblestone street lined with perfectly maintained 18th-century buildings — at night, with the calesa (horse-drawn carriages) clattering across the stones, is genuinely one of the more atmospheric experiences in Southeast Asia.
It is also extremely budget-friendly compared to the islands. A basic room in Vigan runs ₱400–₱700 and the food — particularly Ilocano cuisine — is some of the most interesting regional cooking in the Philippines. Bagnet (crispy pork belly), dinengdeng (vegetable stew with fermented fish), and the local longganisa sausage are must-tries. The palengke (public market) in the morning is the place to eat all three for under ₱200 total.
Vigan is compact enough to walk around in a day or two but rich enough to reward slower exploration. If you are already in northern Luzon for the Banaue Rice Terraces (which are also spectacular — see below), Vigan is a natural stop on the way back to Manila.
From Manila, take an overnight bus from Pasay Bus Terminal. Partas, Dominion, and Viron Transit all operate Manila–Vigan routes. The journey is 8–9 hours and costs ₱700–₱900 one way. Night buses are the efficient option — you travel while you sleep and arrive in the morning. Much cheaper than flying, and the road quality in northern Luzon is generally good.
⭐ Bonus: Banaue Rice Terraces (Ifugao Province)
The Banaue Rice Terraces are often called the “Eighth Wonder of the World” — a dramatic series of 2,000-year-old terraces carved into the mountains of Ifugao Province by the ancestors of the Ifugao people. The scale and engineering behind them is jaw-dropping. The viewpoint from Banaue town is fine, but the real experience is hiking between the villages of Batad and Bangaan, where you are walking through the terraces themselves.
Getting there from Manila: overnight bus to Banaue (8–9 hrs, ₱700–₱800, Ohayami Transit is the main operator). A jeepney from Banaue to Batad’s junction costs ₱100, plus a short hike to the village. Stay a night in Batad — guesthouses charge ₱300–₱600 — and do the full amphitheatre terrace hike in the morning. It is worth every hour of that bus ride.
Must-Try Foods in the Philippines
Filipino food is, bluntly speaking, one of the most overlooked cuisines in Southeast Asia. It does not have the global marketing machine of Thai food or the trendy restaurant following of Vietnamese cooking. But it is deeply flavoured, deeply comforting, and cheaper than almost anything you will find in the region. Here is what to actually eat.

Lechon
A whole pig slow-roasted over charcoal for hours until the skin is impossibly crispy and the meat falls apart. Cebu is the unofficial lechon capital of the Philippines — the Cebuano version is seasoned with lemongrass and garlic stuffed inside the pig, which gives it an edge over the Manila style. You buy it by the kilo at lechon stalls (around ₱350–₱450/kg) and eat it with rice and liver sauce. Do not skip the skin. That is the whole point.
Sinigang
A sour tamarind-based soup — usually made with pork ribs or shrimp — loaded with vegetables like kangkong (water spinach), radish, and eggplant. It is tangy, rich, and filling. This is the kind of food Filipinos eat when they are homesick or when it is raining. It costs ₱80–₱150 in a carenderia (small local canteen) and it is one of the most honest, satisfying meals you will have.
Adobo
Considered the unofficial national dish, adobo is meat (pork or chicken — sometimes both) braised in vinegar, soy sauce, garlic, bay leaves, and black pepper until the sauce is thick and clings to every piece. Every region has its own take — Batangas adobo is drier and almost powdery, Cavite style uses coconut milk. Eat it with plain white rice. It is ₱60–₱100 at a carenderia. Simple, addictive, and everywhere.
Halo-Halo
The Filipino dessert you will either love immediately or need three attempts to understand. It is a tall glass of shaved ice layered with sweetened beans, jackfruit, gulaman (jelly), coconut strips, purple yam (ube), and evaporated milk, topped with a scoop of ube or mango ice cream. Mix it all together — that is the instruction, that is the name (halo-halo means “mix-mix”). Best enjoyed on a hot afternoon. Costs ₱60–₱120.
Balut
This is the one that everyone dares you to eat and then watches your face. Balut is a fertilised duck egg with a partially developed duckling inside, boiled and eaten from the shell, usually with a pinch of salt and vinegar. It is sold by street vendors in the evening for ₱20–₱30 per egg. Do I recommend it? If you are here for the full experience — yes, try one. It tastes better than it looks, and the broth inside the egg is actually delicious. The texture is the challenge, not the flavour.
Sisig
Originally from Pampanga province, sisig is chopped pork face meat (cheeks, ears, snout) seasoned with calamansi, chilli, and onion, served sizzling on a cast-iron plate. It sounds confronting, but the dish itself is incredible — crispy edges, tangy, rich, and best eaten with rice and a cold San Miguel. Pork sisig became so popular that chicken, tuna, and even tofu versions have appeared. The original is still the best. Around ₱150–₱200 in a sit-down restaurant.
Kare-Kare
A thick peanut-based stew made with oxtail (or tripe or knuckles), banana blossom, eggplant, and bok choy. The peanut sauce is mild and nutty — almost dessert-like — which is why it is always served with bagoong (fermented shrimp paste) on the side. The contrast of the sweet peanut stew and the funky, salty bagoong is what makes it work. A restaurant portion with rice runs ₱180–₱280. Do not skip the bagoong.
💡 Budget food tip: Carenderias — small, no-frills local eateries — are your best friend in the Philippines. A full meal with rice, a viand (main dish), and sometimes a small soup runs ₱70–₱130. Look for the ones with the most locals eating — that is always the right signal. Avoid eating every meal near the tourist strip and your food budget drops dramatically.
How to Get Around the Philippines
This is where the Philippines genuinely tests you. With over 7,000 islands, getting between destinations requires either flying or taking ferries — sometimes both. There is no train network connecting islands, no overnight bus that magically gets you from Manila to Palawan. You plan each leg individually. Here is a breakdown.
Between Islands
✈️ Domestic Flights
Cebu Pacific and AirAsia Philippines are the two budget airlines to use. Booked 6–8 weeks ahead, you can find Manila–Puerto Princesa (Palawan) for ₱2,200–₱4,000 return, and Manila–Cebu for ₱2,200–₱3,800 return. Book within 2 weeks and those prices can double or more. The Philippine Airlines (PAL) budget arm, PAL Express, sometimes has competitive fares too. Always factor in baggage — most budget fares are hand luggage only and adding a checked bag costs ₱500–₱800 per sector.
🚢 Ferries
2GO Travel and Starlite Ferries operate the major inter-island routes (Manila–Cebu, Manila–Davao, Cebu–Iloilo, etc.). Overnight ferries are significantly cheaper than flights — a Manila–Cebu ferry ticket in tourist class starts at around ₱1,000–₱1,500, though the journey is 20+ hours. It is a budget option if you have time and a tolerance for sleeping on a boat. Short inter-island routes (like Cebu–Bohol or El Nido–Coron) are done via fast ferry and are more comfortable.
Within Islands & Cities
🚌 Buses & Vans
For longer land routes within Luzon — Manila to Banaue, Manila to Vigan, Manila to Legaspi — buses are the standard. Fares are cheap (₱400–₱1,000 for 6–10 hour journeys). Philtranco, Victory Liner, and Partas are the main operators. Air-conditioned buses are worth the small premium. For shorter routes (like Puerto Princesa to El Nido), shared vans (₱600–₱800, 5–6 hrs) run from designated terminals throughout the day.
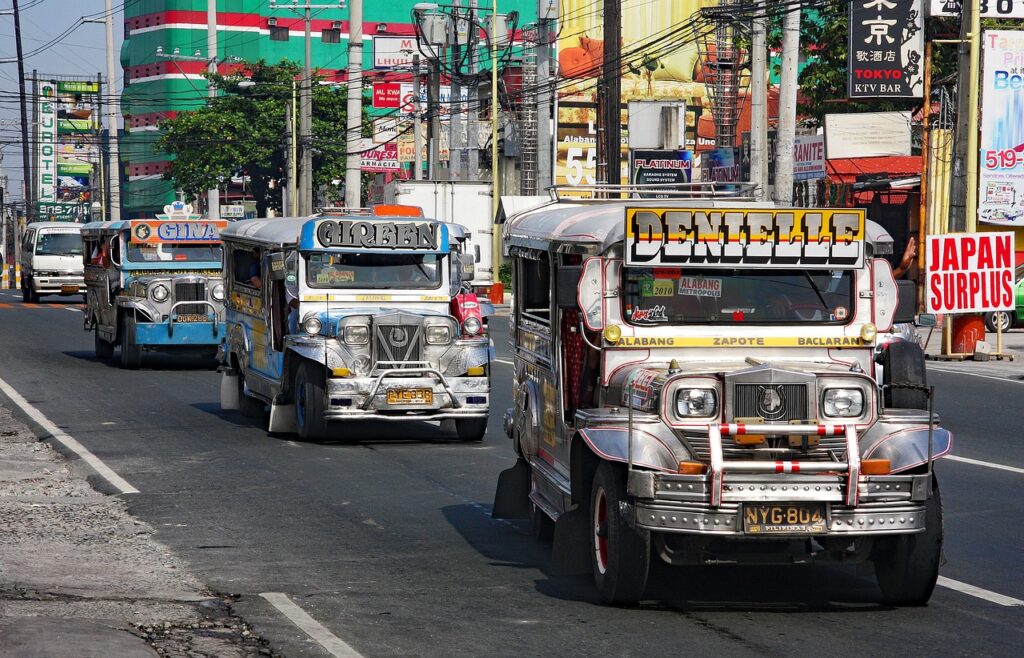
🛺 Jeepneys & Tricycles
Jeepneys are the iconic Filipino public transport — originally modified U.S. military jeeps from after World War II, now produced locally and wildly decorated with chrome, saints, flags, and occasionally fairy lights. They follow fixed routes and cost ₱13 for the first 4 km. Tricycles (a motorcycle with a sidecar) are for shorter distances and negotiate on price — ₱30–₱80 for most hops. Always agree on a price before getting in.
🛵 Motorbike Rentals
On smaller islands like Siargao, Bohol, and Coron, renting a motorbike is the best way to explore. Rates are ₱350–₱500/day for a basic scooter. You will need a driver’s licence — technically an international driving permit is required, though enforcement varies. Ride cautiously, especially on rough rural roads, and always check the bike’s brakes and lights before riding off. Helmets are mandatory and you should genuinely wear one regardless of what you see locals doing.
📱 Grab
Grab (Southeast Asia’s answer to Uber) operates in Manila, Cebu, and a few other cities. It is reliable, metered, and saves you from haggling with taxis who want to charge foreigners triple. In cities, use it for late nights and airport runs. Outside the major cities, it mostly does not exist and you are back to tricycles and habal-habal.
Visa Details for the Philippines
The Philippines is generous with visa-free access compared to many of its Southeast Asian neighbours. Most travellers arriving as tourists will not need to arrange a visa in advance.
Citizens of most Western countries (USA, UK, EU nations, Australia, Canada, Japan, South Korea, and many more) receive a free 30-day stamp on arrival. You need a valid passport with at least 6 months remaining, proof of onward travel (return or connecting ticket), and in theory proof of sufficient funds (around $50/day is the guideline, but this is rarely checked).
Your initial 30-day stamp can be extended at any Bureau of Immigration office for roughly ₱3,030 ($53). Extensions can be done multiple times, theoretically allowing stays up to 36 months, though most backpackers just extend once or twice. The BI offices in Manila, Cebu, and other major cities handle this — bring your passport and allow 1–2 hours.
Some nationalities not covered under the 30-day visa-free arrangement can apply for a visa on arrival for a fee. Check the Philippine Bureau of Immigration website for the current list — it changes periodically.
Here is something most travel blogs get wrong: the Philippine Travel Tax (₱1,620 for economy class) applies primarily to Filipino citizens and foreign nationals who have resided in the Philippines for more than one year. As a foreign tourist staying for less than a year, you are exempt from paying the travel tax. You will, however, pay Airport Terminal Fees upon departure — these are generally included in your international airfare. Always double-check your ticket to confirm what is and isn’t included.
⚠️ Important — Onward Ticket Requirement
Philippine immigration is stricter than many backpackers expect about the onward ticket rule. Even if you plan to travel onward by ferry or overland, immigration officers may ask for a booked departure from the Philippines before allowing entry. If you do not have one, book a refundable or the cheapest dummy ticket out of the country before you fly. Some travellers get turned away at the boarding gate or upon arrival without proof of onward travel. Do not risk it.
Backpacking the Philippines — Budget Breakdown
The Philippines sits in an interesting middle ground for Southeast Asian budgeting. It is not as dirt cheap as Cambodia or Vietnam, but it is nowhere near as expensive as Singapore or even Bangkok at resort prices. The biggest cost factor is transport — specifically, domestic flights between islands. Get those under control and you can backpack here very reasonably.
| Expense Category | Budget Traveller | Mid-Range | Notes |
|---|---|---|---|
| Accommodation (per night) | ₱450–₱900 | ₱1,200–₱2,500 | Dorms in El Nido/Siargao trend pricier; cheaper guesthouses in Vigan/Bohol |
| Meals (per day) | ₱250–₱400 | ₱600–₱1,000 | Carenderias save money; tourist strip restaurants cost 3× more |
| Local Transport (per day) | ₱100–₱300 | ₱400–₱700 | Jeepneys/tricycles are cheap; motorbike rental is best value on islands |
| Domestic Flights (per sector) | ₱1,500–₱3,500 | ₱3,500–₱6,000 | Book 6–8 weeks ahead for best fares — this is non-negotiable |
| Island Hopping Tours | ₱1,200–₱1,800 | ₱3,500–₱6,000 | Shared tours are fine; private boats are not worth it solo |
| Activities & Entrance Fees | ₱100–₱500 | ₱500–₱1,500 | Most beaches free; national parks/museums are minimal fees |
| SIM Card (local data) | ₱299–₱599 for 30 days (Globe or Smart) | Buy at the airport or 7-Eleven; 15–30 GB is typical | |
💡 Realistic daily budget (2026): On a genuine shoestring — dorm beds, carenderias, shared boats, local transport — you can do ₱1,600–₱2,200/day ($28–$39). Note that the very bottom of this range (around $28) is tight and requires consistently eating local, sleeping in dorms, and avoiding tourist-strip restaurants. For a comfortable backpacker trip with a few activities and occasional mid-range meals, budget ₱2,500–₱4,000/day ($44–$70). Flying every few days will blow any budget — plan your route to minimise backtracking and unnecessary flights.
Budget Tips That Actually Help
- Book domestic flights on Tuesdays and Wednesdays — prices are typically lower mid-week on Cebu Pacific and AirAsia Philippines.
- 7-Eleven and Ministop convenience stores are everywhere and surprisingly useful — water (₱10–₱15), cheap sandwiches (₱35–₱50), and you can top up load (prepaid mobile credit) there too.
- Bargain at markets, not at fixed-price shops. Wet markets (palengke) are always cheaper than supermarkets for fruit and street snacks.
- Group up for island hopping. A boat that costs ₱8,000 for a private charter splits very differently between 2 people vs 8 people.
- Overnight buses between Luzon destinations save both money and accommodation costs. Ride overnight, arrive in the morning, and start exploring.
Essential & Useful Information
Best Time to Visit
The Philippines has two main seasons: the dry season (amihan) from November to May, and the wet season (habagat) from June to October. The dry season is broadly the best time to visit — clearer skies, calmer seas, and better diving and snorkelling visibility. However, the Philippines sits in one of the world’s most active typhoon belts, and even the “safe” months are not entirely typhoon-free. November to February is the most reliably good window.
A few regional nuances: the east coast of the Philippines (Siargao, Samar, Eastern Leyte) gets the worst of Pacific typhoons, particularly October–December. The west coast (Palawan) is generally shielded and can be visited a bit later into the year. Palawan’s southwest monsoon affects it differently — Puerto Princesa and El Nido have their own rain patterns.
💊 Health & Safety
Consult your doctor about vaccinations before visiting — Hepatitis A, Typhoid, and Tetanus are the standard recommendations for the Philippines. Dengue fever is present and mosquito repellent is important, especially in areas with standing water. Malaria risk is low in major tourist areas but exists in remote parts of Palawan and Mindanao — check current guidelines.
Tap water is not safe to drink in most of the Philippines. Stick to bottled or filtered water. Travel insurance is not optional — the inter-island nature of travel here means medical evacuation in a remote island scenario could cost an extraordinary amount without coverage.
📶 Connectivity
Globe and Smart are the two major networks. A Globe or Smart SIM card with a 30-day unlimited data promo runs ₱299–₱699 and is available at the airport, 7-Eleven, and convenience stores. Signal is generally good in cities and popular tourist spots. In remote areas — Batanes, interior Mindanao, some Palawan barangays — expect limited or no signal. Download offline maps (Maps.me or Google Maps offline) before heading to remote islands.
💰 Money & ATMs
ATMs are available in cities and major tourist areas. In remote island towns like El Nido and Siargao, ATMs do exist but frequently run out of cash on weekends and during peak season. Bring enough cash from the last major city you were in. BDO, Metrobank, and BPI ATMs are the most common and accept foreign cards with reasonable fees. Credit cards are accepted in mid-range and upscale establishments but most carenderias, tricycles, and local vendors are cash only.
🤝 Culture & Customs
Filipinos are genuinely among the most hospitable people in Asia — it is not a tourism cliché, it is just true. Smiling and greeting people with a simple “Hello po” (po is a respectful particle in Filipino) goes a long way. Dress modestly when entering churches — the Philippines is a predominantly Catholic country and churches are active places of worship, not tourist attractions, even when they are spectacular colonial structures. Bargaining is normal at markets but aggressive haggling is considered rude. The Filipino concept of hiya (shame/face) means direct confrontation or raised voices will make interactions worse, not better. Stay calm, stay cheerful, and most problems resolve themselves.
🚨 Safety Notes
The Philippines is generally safe for travellers in the tourist areas listed above. Standard big-city precautions apply in Manila — watch your belongings in crowded areas, use Grab rather than hailing unmarked taxis at night, and avoid displaying expensive gear openly. The Mindanao region, particularly western Mindanao and the Sulu Archipelago, has ongoing security issues and most governments advise against non-essential travel there — check your government’s travel advisory before planning anything in that region. Davao City, Cagayan de Oro, and Camiguin (northern Mindanao) are generally considered safe for tourists but check current advice closer to your trip date.
Sample Backpacker Itinerary
Planning a Philippines trip is a genuine puzzle because of the island geography. The key rule: avoid backtracking to Manila between island groups whenever possible — that costs time and money. Here are two practical frameworks depending on how long you have.
2-Week Highlights Route
Days 1–2: Manila — Arrive, recover from jet lag. Intramuros, Fort Santiago, Binondo for food. Night in Makati.
Days 3–5: El Nido, Palawan — Fly Manila to Puerto Princesa, van to El Nido. 2 island hopping tours (Tour A and Tour C). Sunsets from Nacpan Beach.
Days 6–8: Coron, Palawan — Ferry El Nido to Coron. Island hopping, Kayangan Lake, Mt. Tapyas sunset.
Days 9–10: Cebu — Fly Coron to Cebu. Day trip to Moalboal — sardine run snorkelling. Lechon dinner in the city.
Days 11–12: Bohol — Fast ferry to Tagbilaran. Chocolate Hills, tarsiers, Alona Beach, diving.
Days 13–14: Manila or Fly Home — Ferry back to Cebu, fly to Manila for departure. Or add 2–3 nights in Siargao instead of returning to Manila early.
3-Week Extended Route
Take the 2-week route above and add: Siargao (fly from Cebu, 3–4 nights surfing and exploring) and either Vigan + Banaue (overnight bus from Manila before or after your island loop) for a proper taste of northern Luzon. Three weeks is the sweet spot for the Philippines — you see the islands AND the mainland heritage without feeling rushed on either.
Frequently Asked Questions
Is the Philippines expensive to backpack compared to other Southeast Asian countries?
It is mid-range within Southeast Asia. Daily living costs — food, accommodation, local transport — are cheaper than Thailand, comparable to Vietnam, and much cheaper than Singapore. The variable is domestic flights. If you need to fly between every island, your budget inflates significantly. The Philippines rewards people who plan their route intelligently rather than island-hopping impulsively. A well-planned route costs $35–$50/day; a poorly planned one can hit $80–$120/day through unnecessary flights and backtracking.
Is the Philippines safe for solo travellers?
Yes, in the major tourist areas — Manila, Palawan, Cebu, Bohol, Siargao, and Vigan — solo travellers, including solo female travellers, generally have positive experiences. Standard urban awareness applies in Manila. The genuine safety concern is western and southern Mindanao, where travel advisories from most Western governments recommend avoiding non-essential travel. Stick to the destinations in this guide and you will be fine. The Filipino people are exceptionally welcoming to solo travellers.
Do I need to speak Filipino (Tagalog) to travel here?
No. English is widely spoken across the Philippines — it is actually a co-official language and is taught in schools from an early age. Most Filipinos in tourist areas, cities, and even small towns communicate comfortably in English. This makes the Philippines one of the easiest Southeast Asian countries to navigate without learning the local language, though learning a few words (salamat = thank you, magkano = how much?) is always appreciated and will get you genuine smiles.
What is the best way to get cheap domestic flights?
Book through Cebu Pacific or AirAsia Philippines directly — their own websites sometimes have seat sales that third-party booking engines miss. Sign up for Cebu Pacific’s mailing list for sale alerts. Book at least 6–8 weeks ahead for the best base fares. Fly on weekdays if your schedule allows. And critically — be flexible on dates by even one day and you can often save ₱500–₱1,000 per ticket.
Should I visit Boracay?
Boracay’s White Beach is legitimately beautiful — fine powdery white sand and clear water. However, it is also the most commercialised beach destination in the Philippines. Prices are significantly higher than elsewhere, the party scene is aggressive, and the beach is packed during peak season. If you are prioritising budget and natural, uncrowded scenery, El Nido and Coron deliver far better value. If you want beach club vibes and a lively nightlife scene, Boracay is your pick. It is a different kind of Philippines experience.
How many islands should I realistically visit in 2 weeks?
Realistically, 3–4 island groups in 2 weeks if you want to actually experience each one rather than just pass through. The Philippines has a way of tempting you to over-plan — every island sounds incredible and you want to do all of them. Resist the urge. Spending 3–4 nights in one place gives you time for day trips, weather delays (which happen), and those random afternoons where you find a beach bar and cannot bring yourself to leave. Some of the best Philippines travel stories happen when you miss your planned boat and end up staying an extra day.
What app is most useful for getting around the Philippines?
Grab for city transport. 12Go Asia for booking buses, ferries, and some flights with easy seat selection. Cebu Pacific and AirAsia apps for flight tracking and booking. Google Maps works well in major areas (download offline maps). For accommodation, Hostelworld for dorms and Agoda tends to have better deals on Philippine guesthouses than Booking.com in many cases.
Final Thoughts
Have questions about backpacking the Philippines or want to share your own experience? Drop a comment below — the Real Backpackers community is here to help you plan the trip properly.